Your RMR helps you stop guessing about calories. Since resting metabolism makes up about 60% to 75% of the calories you burn each day, a measured RMR can give you a better starting point for fat loss, muscle gain, maintenance, and recovery.
Here’s the short version:
A few numbers stand out. Fitness trackers may overestimate calorie burn by 20% to 50%. People often underreport food intake by 30% to 50%. And long dieting can lower resting calorie burn by 100 to 300 calories per day beyond what weight loss alone would predict.
If I want one number to guide calorie planning, RMR is where I’d start. It gives me a baseline I can use with body composition, training, and blood work to make better day-to-day choices.
| Term | What it means | Why it matters |
|---|---|---|
| BMR | Calories burned at full rest under lab conditions | Lowest resting estimate |
| RMR | Calories burned at rest in normal testing conditions | Best starting point for calorie planning |
| TDEE | Total calories burned in a full day | Used to set maintenance, deficit, or surplus |
The main idea is simple: when the starting calorie number is off, the whole plan can drift off course.
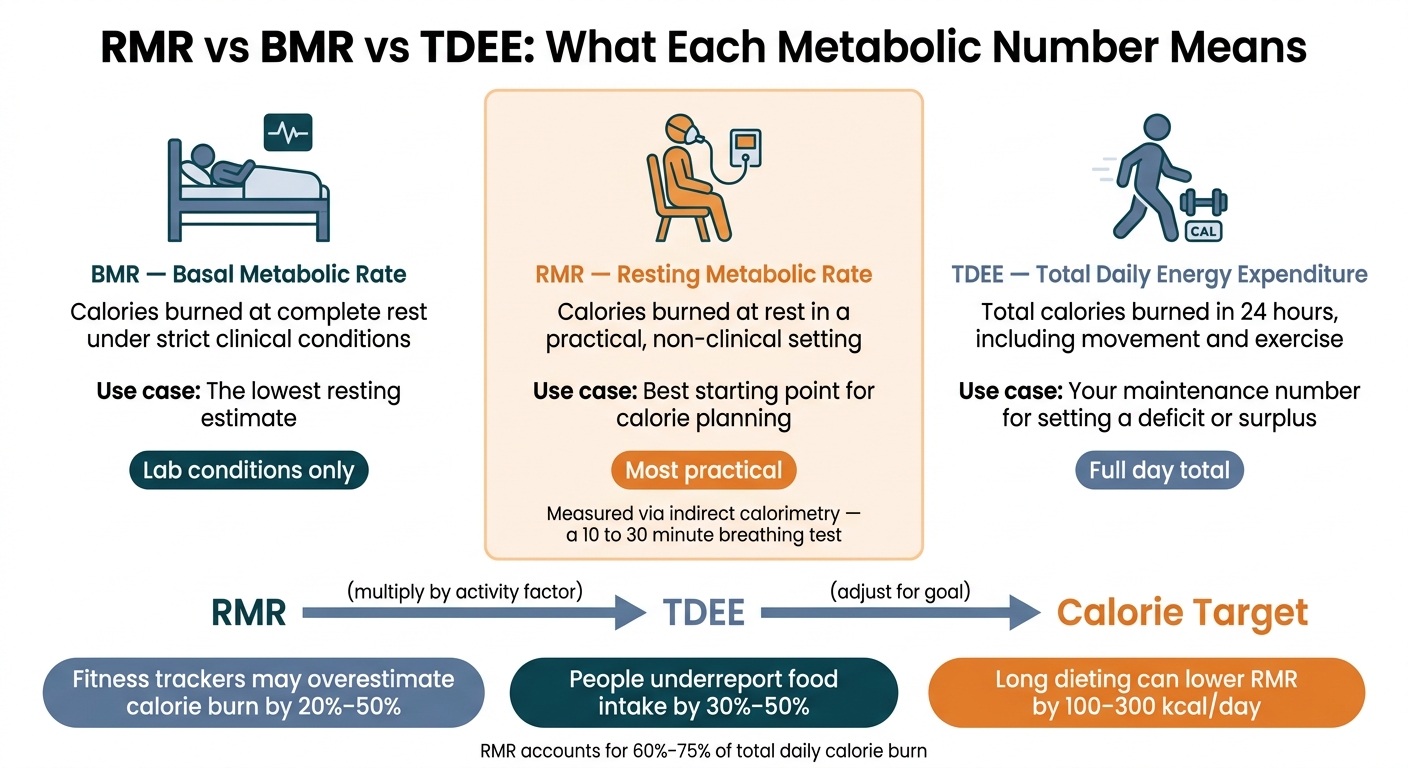
RMR vs BMR vs TDEE: What Each Metabolic Number Means
RMR gives you a measured starting point for calorie planning. Once you have that number, you can turn it into a daily calorie target that makes sense.
Lean body mass is the main driver of RMR. Age, sex, thyroid function, sleep, and chronic stress can shift it too.
People often lump these terms together, but they do different jobs.
| Metric | What it measures | How it's used |
|---|---|---|
| BMR (Basal Metabolic Rate) | Calories burned at complete rest under strict clinical conditions | The lowest resting estimate |
| RMR (Resting Metabolic Rate) | Calories burned at rest in a practical, non-clinical setting | The most practical starting point for calorie planning |
| TDEE (Total Daily Energy Expenditure) | Total calories burned in 24 hours, including movement and exercise | Your maintenance number for setting a deficit or surplus |
RMR is often the best place to start because it’s measured under normal conditions, not lab-only conditions. It also helps you estimate TDEE. From there, you can factor in activity level, estimate maintenance calories, and set a target.
Most calorie targets miss the mark because they’re built from formulas meant for an average person, not for you. The Mifflin-St Jeor formula, one of the most common calorie-estimate formulas, doesn’t account for body composition. So two people with the same weight, height, and age can still have very different calorie needs.
In one study of former Biggest Loser contestants, resting metabolic rates remained 704 calories per day below formula predictions six years later. Fitness trackers can overestimate calorie burn by 20% to 50%, while people often underreport food intake by 30% to 50%.
That’s the gap. And it’s why a measured RMR usually gives you a better starting point than formula-only estimates.
Most nutrition issues start with the same problem: the calorie target is off. If the starting number is wrong, the whole plan can drift. That’s where measured RMR helps. It gives you a tested baseline, so you’re not guessing. From there, you can turn that number into a calorie target that fits your goal.
Start with your measured RMR, then factor in activity and your goal. Once you’ve worked out your estimated maintenance level, the calorie change is pretty simple:
| Goal | Calorie Adjustment | Expected Outcome |
|---|---|---|
| Gentle fat loss | −250 kcal/day | ~0.5 lb loss/week; minimizes muscle loss |
| Standard fat loss | −500 kcal/day | ~1 lb loss/week; clinical benchmark |
| Lean bulk | +200 to +400 kcal/day | Maximizes muscle vs. fat gain ratio |
| Maintenance | Equal to TDEE | Weight stability and recovery |
This is where people often overcomplicate things. In practice, it’s more like setting the thermostat in your house. Too low, and fat loss may come with extra fatigue or muscle loss. Too high, and a lean bulk can turn into plain weight gain.
If your results have stalled, the problem often isn’t poor tracking. It’s metabolic adaptation.
When calories stay low for a while, the body can burn less energy and even reduce day-to-day movement. That drop can cut energy use by hundreds of calories per day. A 25% caloric deficit held for eight weeks can lower BMR by 100 to 300 calories per day beyond what tissue loss alone would explain.
That’s the frustrating part. A deficit that worked at first can stop working later because your metabolism adjusts. You usually won’t notice this shift from one day to the next, but over time it can slow progress in a big way.
Measured RMR is what shows the gap. It tells you how far your metabolism has moved from where formulas say it should be. And when metabolic adaptation is large, prediction equations can miss by a lot.
Once you know why RMR matters, the next step is getting a number you can trust. If formulas are a rough guess, indirect calorimetry measures your RMR directly. It is the clinical gold standard for measuring RMR.
Here’s what happens during the test: you breathe through a mask or mouthpiece while the device tracks how much oxygen you use and how much carbon dioxide you produce. From that, it calculates how many calories your body burns at rest. The test usually lasts 10 to 30 minutes, and most of that time is just you sitting still and breathing normally.
Prep matters more than most people think. For the best result, fast for 6 to 12 hours, avoid hard exercise for 24 hours, and do the test in the morning. Even a drink with calories or a tough workout the day before can shift the result.
This is where direct testing helps. It can show the effect of things like muscle mass, hormonal status, or an RMR that comes in lower than a formula would predict. A calculator can’t see any of that.
Calculators still have a place. They’re fine for a starting estimate. But they’re built on averages, and that’s the trade-off.
| Feature | Indirect Calorimetry | Metabolic Calculators |
|---|---|---|
| Method | Analyzes O2 consumed and CO2 produced | Mathematical formulas based on height, weight, age, and sex |
| How it works | Breath measurement during a 10–30 minute test | Estimates burn using population averages |
| Best use case | Plateaus, clinical nutrition, performance training | Fast starting estimate |
| Limitations | Needs equipment and proper prep | Misses individual factors like muscle mass and hormonal status |
| Accuracy | Reflects individual biology | Can be off by 10% to 36% depending on the person |
That gap matters. If your plan has stalled and you’re trying to figure out why, a measured number gives you something far more useful than another estimate.

Benchmark Body Metrics uses indirect calorimetry to measure RMR directly. On its own, that’s useful. Paired with other tests, it becomes much more practical.
A DEXA scan shows body composition, including lean mass and fat, which helps explain why your RMR looks the way it does. VO2 Max testing adds a view of cardiovascular capacity and training thresholds. Blood panels can add context around thyroid, insulin, and testosterone markers.
Put together, those data points give you a working baseline. Instead of guessing on calories or recovery, you’re making calls based on body composition, aerobic fitness, blood work, and measured RMR.
Once you have a measured baseline, RMR becomes a tracking tool, not just a number.
RMR shifts over time, and repeat testing helps you see whether your calorie intake and recovery plan still fit your current metabolism.
A long calorie deficit can lower metabolism without making much noise from week to week. Repeat testing shows whether your maintenance calories have moved, so you can change intake before a plateau hits.
RMR changes can also flag when training stress is starting to beat recovery. A lower RMR, or lower energy output during easy efforts, can point to building fatigue. If your energy is down and your strength is slipping, repeat testing can show strain that a training log may miss.
Testing every 8 to 12 weeks can help you decide when to change calories, training load, or recovery work.
RMR makes more sense when you read it next to body composition testing data. A DEXA scan adds lean mass and fat mass to the picture. That helps explain your measured RMR and gives you a better read on whether a fat-loss phase is holding onto lean mass.
Blood markers add health context that RMR can't give by itself. They can show when things are drifting out of range before symptoms show up.
| Marker | Optimal Range | High-Risk Threshold |
|---|---|---|
| Fasting insulin | < 5 µIU/mL | > 15 µIU/mL |
| HbA1c | < 5.4% | > 6.0% |
| hs-CRP | < 0.5 mg/L | > 3.0 mg/L |
| Fasting triglycerides | < 80 mg/dL | > 150 mg/dL |
Put together, this gives you one clear data stack: RMR shows calorie needs, DEXA adds lean-mass context, and blood markers point to health risk.
Your RMR is the base for calorie decisions tied to fat loss, muscle gain, maintenance, and recovery. A measured number cuts out the error that generic formulas can't escape. It shows what your body is doing now, not what an average-based estimate says it might do.
When something stops working - a plateau, steady fatigue, or stalled progress - repeat RMR testing gives you a direct answer. You can then adjust calories, training, and recovery with more confidence.
An RMR test helps you move past rough guesses and make smarter choices about nutrition, training, and long-term health.
It’s especially helpful if your goal is fat loss, muscle gain, or weight maintenance. It can also give you a clearer read on why your current plan isn’t working, whether you’ve hit a weight-loss plateau or you’re dealing with hormonal or metabolic issues.
Yes. Your Resting Metabolic Rate (RMR) can change over time. It often shifts with things like body composition, hormone health, and long stretches of calorie restriction.
For example, major weight loss or a long calorie deficit can slow your metabolism. On the flip side, adding muscle or following a structured metabolic reset may help restore or increase it. Testing every 8 to 12 weeks can help keep your nutrition and training plan on track.
Use your Resting Metabolic Rate (RMR) results to build a nutrition plan that fits your goal, whether that’s weight loss, muscle gain, or maintenance.
RMR tells you how many calories your body burns at rest. That makes it much easier to set a daily calorie target that isn’t just a guess. It can also help explain why your current plan has stalled. Sometimes the issue isn’t effort. It’s that your calorie intake doesn’t match what your body is actually using.
To stay on track and avoid plateaus, book follow-up assessments every 8 to 12 weeks. Then adjust your plan based on the new results.


.svg)
